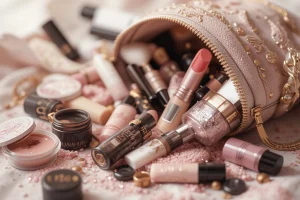
Travel Makeup Hacks: Keep It Small, Leak-Proof, and Stress-Free!
Want to pack your travel makeup as compactly as possible without any leaks? You’re in luck! As a travel blogger who jets off 1–2 times a month, both domestically and internationally, I’ve mastered the art of downsizing my everyday cosmetics for travel—and I’m here to share my secrets with you.
Sure, you could try cutting up a straw to store your products, but honestly, I wouldn’t recommend it. DIY straw containers tend to leak, crush easily, or turn into a sticky mess due to airplane pressure changes—leaving your makeup pouch in chaos. What’s the point of going small if it’s unusable at your destination, right?
Instead, I’ve got a foolproof method that works even for long-haul international flights. No fancy tools needed—just affordable items from dollar stores or convenience shops like 100-yen stores or local marts. From skincare essentials to foundation and concealer, I’ll show you how to bring your go-to products along without the bulk.
I’ll walk you through it step-by-step, with a few handy tips to avoid mishaps. If you’re tired of wrestling with travel makeup woes, stick around—this guide will make your packing routine a breeze and your trips even more enjoyable!
Why I Ditched Travel-Sized Refill Containers
Lots of people love transferring their everyday skincare into those tiny travel containers from 100-yen stores for trips. But me? I’ve sworn off those little refill bottles entirely.
Why, you ask? Because they turn my makeup pouch into a jumbled mess where I can’t tell what’s what. If you’re just packing one or two products, it might be fine. But when you’ve got morning creams, night serums, moisturizers, and more, squeezing them all into those mini containers makes it impossible to figure out which is which (laughs).
I’ve tried fixes—color-coding the lids, scribbling contents with a marker, even sticking on labels. But no matter what, they still end up a chaotic pile in my pouch, impossible to grab quickly without a hassle. Worse yet, airplane pressure changes have caused creams to leak out, leaving my makeup bag a sticky disaster more times than I’d like to admit (sobs).
So yeah, I’ve waved goodbye to those travel-sized refill containers for good.
My Go-To Travel Hack: 100-Yen Store Contact Lens Cases!
So, what do I use to carry my makeup on trips? Believe it or not, it’s those cute contact lens cases you can snag at 100-yen stores! I pop my creams into these adorable containers—mine have Hello Kitty designs, but that’s just my vibe. Any pattern works, and you can grab them at dollar stores or convenience shops too.
These contact lens cases are designed to hold liquids, so leaks are rarely an issue (though overfilling can get tricky, so watch out!). Plus, with the right-eye and left-eye compartments attached, they don’t scatter all over your pouch—no more “where’d it go?” moments. The color-coding and “R” or “L” labels make it super easy to tell what’s inside at a glance, which is a total game-changer.
I keep it simple: “night stuff on the left, day stuff on the right.” Specifically, I stash my night pack cream in the “L” side and a daytime all-in-one cream with sunscreen in the “R” side. Mixing up cases with different colors or patterns cuts down on mix-ups even more—pretty handy, right?
That said, while I was obsessed with these contact cases for a while, I recently stumbled across an even better option. Now, I’ve switched everything over to that new find!
My Travel Must-Have: A Mirror-Equipped Contact Case from 100-Yen Stores
Here’s what I’m currently using to pack my makeup for trips: a contact lens storage case from 100-yen stores like Daiso.
This little gem is about 6cm x 7cm, super compact, and comes with a handy mirror. Inside, you’ve got a round case for lenses, a cylindrical container for liquid, and even a pair of tweezers—all bundled together. But since I don’t need tweezers for makeup, I ditch them and just use the cylindrical container, the lens case, and the mirrored outer shell.
Contact Lens Case with L and R Labels for Easy Sorting
My old Hello Kitty case was color-coded in bright white and red, but my current one rocks a sleek monochrome vibe. It’s got a black lid and a white lid, each clearly marked with “L” or “R.” These colors and labels make it a breeze to organize my products.
For me, the black “L” holds my night pack cream, while the white “R” is for my daytime all-in-one cream. The cylindrical liquid container? That’s perfect for my serum, ready to go wherever I travel.
Makeup Refill Tip #1
Be careful not to overfill—keep it under full capacity!
From Bulky to Super Compact!
The containers for your everyday cosmetics can be pretty big and bulky, right? But transfer them into a contact lens case, and they shrink down to an amazingly compact size!
At first glance, these tiny cases might make you think, “No way! This won’t be enough!” But here’s the thing—daily creams aren’t something you pile on in heaps. For me, the amount that fits in this case is plenty for a week-long trip.
If you’re worried about running out, try transferring your products ahead of time and testing how many days they last. It’s a simple way to put your mind at ease!
Makeup Refill Tip #2
If you’re unsure about the amount, test it out at home first!
All the Skincare I Need for Travel
My travel skincare routine? Just a cream in a contact lens case and a few pre-portioned serum packs. It’s so small and compact, yet I can still do my full routine—pretty impressive, right?
Even better, I don’t have to stress about finding a mirror. This case comes with one built in, so I’m covered no matter where I am!
BB Cream Fits Perfectly in 100-Yen Store Containers Too
It’s not just skincare—BB cream gets the same treatment in my contact lens case! I stash concealer in the left “L” side and tube-style BB cream in the right “R” side.
When refilling, I don’t go all the way to the top. Stopping at about 90%, just like with my creams, keeps it just right.
Liquid Foundation Goes in the Cylindrical Container
I use the cylindrical liquid container for my liquid foundation. The white cap pops off easily, making it a total breeze to refill.
Heads up, though—liquid foundation can leak due to airplane pressure changes, so don’t overfill it! Keeping it at 80–90% capacity works like a charm.
Oh, and if I want to bring more liquid products, those 100-yen store “soy sauce containers” from the bento section are surprisingly handy. They used to just come in fish shapes, but now there’s a bunch of fun designs to pick from!
Foundation This Tiny? 100-Yen Store Compact Travel Magic!
My refilled foundation shrinks down to this—seriously compact! This amount in the container easily lasts a week-long trip. Honestly, with foundation, it might even stretch to 10 days. Since everyone uses different amounts, I’d suggest transferring it beforehand and testing, “How long does this last me?”—it’s a stress-free way to know for sure!
All the Foundation I Need Fits Right Here
Liquid foundation for my base, concealer—everything included, and it’s just this much!
The black case on the right holds a mini foundation I grabbed for about 500 yen at a convenience store (FamilyMart). The round white case up top is my finishing powder. I don’t usually use both at once—it depends on my skin that day. Some days it’s “Powder’s enough,” others it’s “Let’s go with foundation,” so I carry both.
Packing liquid foundation and concealer into a contact lens storage case means no more lugging around bulky tubes or cases. Everything foundation-related stays in one spot, so my makeup pouch doesn’t turn into a scattered mess—super easy and convenient!
The trick to enjoying travel? Keep your luggage as light and compact as possible. Less baggage leaves room for cute souvenirs or tasty local treats to bring home—trust me, it’s a total game-changer!
Summary: Travel Makeup Packing Hacks
Want your travel makeup compact but leak-free? Here’s a travel blogger’s tried-and-true guide to solve that problem!
Those 100-yen store mini travel containers might seem handy, but I skip them—they clutter my pouch and leak on flights. Instead, I swear by 100-yen contact lens cases. Creams and BB cream go in the “L” and “R” compartments, while liquid foundation fits perfectly in the cylindrical tube, shrinking everything down to a super manageable size.
A mirror-equipped case means you’re set to primp anywhere. Just fill to about 80–90% to avoid spills—safety first! Bonus tip: bento soy sauce containers are a surprising lifesaver too. Less luggage means more room for souvenirs, so give it a try on your next trip!


![[Actual experience report] Female must-see! The contents of the baggage of 7 kg within the overseas travel / in-flight carry-in restriction are released with LCC! (Women's edition) This one-week trip is OK!](/data/contents/thum/AIRLINE-LCC-001.webp)


 Credit Card
セゾンプラチナ・ビジネス・アメックスでJALマイルとプライオリティパスを最大活用!
セゾンプラチナ・ビジネス・アメックスはJALマイル換算率トップクラス&プライオリティパス無料!年会費33,000円でマイラーや出張族に最適。特典や申し込み方法を解説。
Credit Card
セゾンプラチナ・ビジネス・アメックスでJALマイルとプライオリティパスを最大活用!
セゾンプラチナ・ビジネス・アメックスはJALマイル換算率トップクラス&プライオリティパス無料!年会費33,000円でマイラーや出張族に最適。特典や申し込み方法を解説。
 OSAKA EXPO 2025
Osaka-Kansai Expo 2025: Budget-Friendly Itineraries – Enjoy with ¥10,000, ¥30,000, or ¥50,000
Enjoy Osaka-Kansai Expo 2025 on a budget! Plans for ¥10,000, ¥30,000, ¥50,000 with tips to avoid crowds and explore Osaka.
OSAKA EXPO 2025
Osaka-Kansai Expo 2025: Budget-Friendly Itineraries – Enjoy with ¥10,000, ¥30,000, or ¥50,000
Enjoy Osaka-Kansai Expo 2025 on a budget! Plans for ¥10,000, ¥30,000, ¥50,000 with tips to avoid crowds and explore Osaka.
 Cruise Travel
How to Enjoy a Luxury Cruise on a Budget: Beginner’s Guide
Discover how to enjoy a luxury cruise on a budget in 2025! Beginner-friendly tips to find cheap deals, save on extras, and plan your dream voyage affordably.
Cruise Travel
How to Enjoy a Luxury Cruise on a Budget: Beginner’s Guide
Discover how to enjoy a luxury cruise on a budget in 2025! Beginner-friendly tips to find cheap deals, save on extras, and plan your dream voyage affordably.
![Ultimate Guide to Cruise Ship Dress Codes: Formal Night Outfits with Photo Examples [2025 Edition]](/datas/contents/img/CRUISE-DC/thum.webp) Cruise Travel
Ultimate Guide to Cruise Ship Dress Codes: Formal Night Outfits with Photo Examples [2025 Edition]
Discover cruise ship dress codes with our 2025 guide! Get outfit ideas for formal nights and casual evenings, complete with photo examples. Perfect for first-time cruisers!
Cruise Travel
Ultimate Guide to Cruise Ship Dress Codes: Formal Night Outfits with Photo Examples [2025 Edition]
Discover cruise ship dress codes with our 2025 guide! Get outfit ideas for formal nights and casual evenings, complete with photo examples. Perfect for first-time cruisers!
 Cruise Travel
 Guide | A Luxurious Adventure Across the World's Seas
Embark on a cruise adventure across the world’s seas! Explore the Mediterranean, Caribbean, Alaska, and more with measuretrip.com. Find beginner guides and the latest plans for your dream cruise today!
Cruise Travel
Cruise Travel Guide | A Luxurious Adventure Across the World's Seas
Embark on a cruise adventure across the world’s seas! Explore the Mediterranean, Caribbean, Alaska, and more with measuretrip.com. Find beginner guides and the latest plans for your dream cruise today!
 Travel Tips
Avoid Power Bank Confiscation in China Transit: 2025 Tips for Smooth Airport Security
Don’t lose your power bank in China’s airports! Learn 2025 tips to navigate transit security at Beijing, Shanghai, and Guangzhou. From power bank rules to one-time entry, ensure a hassle-free layover.
Travel Tips
Avoid Power Bank Confiscation in China Transit: 2025 Tips for Smooth Airport Security
Don’t lose your power bank in China’s airports! Learn 2025 tips to navigate transit security at Beijing, Shanghai, and Guangzhou. From power bank rules to one-time entry, ensure a hassle-free layover.
![Air China Seat Selection Guide and Contact Number [2025 Latest]](/datas/contents/img/AIRLINE-CA-001/thum.webp) Airlines
Air China Seat Selection Guide and Contact Number [2025 Latest]
Learn how to select seats on Air China! Step-by-step guide for online and phone (0120-783-880) seat selection, plus tips and FAQs. Updated for 2025.
Airlines
Air China Seat Selection Guide and Contact Number [2025 Latest]
Learn how to select seats on Air China! Step-by-step guide for online and phone (0120-783-880) seat selection, plus tips and FAQs. Updated for 2025.
 OSAKA EXPO 2025
Top 10 Highlights of Osaka Expo 2025: Experience the Future in Japan
Discover the Top 10 highlights of Osaka-Kansai Expo 2025! From the Grand Roof Ring to international pavilions and futuristic food experiences, this travel guide covers must-see spots. Embrace the theme "Designing Future Society for Our Lives" and plan your unforgettable journey to Yumeshima!
OSAKA EXPO 2025
Top 10 Highlights of Osaka Expo 2025: Experience the Future in Japan
Discover the Top 10 highlights of Osaka-Kansai Expo 2025! From the Grand Roof Ring to international pavilions and futuristic food experiences, this travel guide covers must-see spots. Embrace the theme "Designing Future Society for Our Lives" and plan your unforgettable journey to Yumeshima!
 Airlines
Jetstar Baggage Rules Complete Guide: Are Size and Weight Limits Strict? 2025 Latest Info
A complete guide to Jetstar’s baggage rules in 2025! Learn about carry-on size and weight limits, checked baggage fees, and how strict the checks are. Essential for a hassle-free trip!
Airlines
Jetstar Baggage Rules Complete Guide: Are Size and Weight Limits Strict? 2025 Latest Info
A complete guide to Jetstar’s baggage rules in 2025! Learn about carry-on size and weight limits, checked baggage fees, and how strict the checks are. Essential for a hassle-free trip!
 Airlines
Jetstar A322 Economy Class Trip Report: Osaka (Kansai) ⇔ Okinawa (Naha)
A detailed trip report of flying Jetstar Japan’s A322 Economy Class from Osaka (Kansai) to Okinawa (Naha). Covers seat comfort, onboard service, booking tips, and airport experience, with practical insights for Okinawa travelers.
Airlines
Jetstar A322 Economy Class Trip Report: Osaka (Kansai) ⇔ Okinawa (Naha)
A detailed trip report of flying Jetstar Japan’s A322 Economy Class from Osaka (Kansai) to Okinawa (Naha). Covers seat comfort, onboard service, booking tips, and airport experience, with practical insights for Okinawa travelers.
 OSAKA EXPO 2025
Osaka Expo Travel Plan: 1-Night, 2-Day Course
Discover Expo 2025 Osaka, Kansai, Japan – a six-month global event on Yumeshima island, themed 'Designing Future Society for Our Lives.' Explore innovative pavilions, sustainable solutions, and international culture, expecting 28 million visitors from April to October 2025.
OSAKA EXPO 2025
Osaka Expo Travel Plan: 1-Night, 2-Day Course
Discover Expo 2025 Osaka, Kansai, Japan – a six-month global event on Yumeshima island, themed 'Designing Future Society for Our Lives.' Explore innovative pavilions, sustainable solutions, and international culture, expecting 28 million visitors from April to October 2025.
 OSAKA EXPO 2025
Complete Guide to Getting to Expo 2025 Osaka from Tokyo
A complete guide to accessing Expo 2025 Osaka from Tokyo! Explore Shinkansen, airplane, highway bus, and car options with detailed routes, travel times, costs, and tips. Plan your perfect trip to the Yumeshima venue.
OSAKA EXPO 2025
Complete Guide to Getting to Expo 2025 Osaka from Tokyo
A complete guide to accessing Expo 2025 Osaka from Tokyo! Explore Shinkansen, airplane, highway bus, and car options with detailed routes, travel times, costs, and tips. Plan your perfect trip to the Yumeshima venue.
 OSAKA EXPO 2025
2025 Osaka Expo Highlights Guide
Introduction to Osaka Expo 2025 Highlights. Discover the Grand Roof Ring, explore the diverse pavilions, and immerse yourself in cutting-edge future technologies. Plan your visit seamlessly by securing tickets, learning about access to Yumeshima, and managing crowds effectively for the ultimate travel experience!
OSAKA EXPO 2025
2025 Osaka Expo Highlights Guide
Introduction to Osaka Expo 2025 Highlights. Discover the Grand Roof Ring, explore the diverse pavilions, and immerse yourself in cutting-edge future technologies. Plan your visit seamlessly by securing tickets, learning about access to Yumeshima, and managing crowds effectively for the ultimate travel experience!
 Article
マリオット ボンヴォイ アメックスで旅費を劇的に節約!高級ホテルに無料宿泊&マイルで飛行機代も無料!
シェラトンやマリオット、リッツ・カールトンに無料宿泊したり、部屋のアップグレードがあったり、無料でレイトチェックアウトできたり…。世界中を旅するモリオとミヅキの旅行をアップグレードさせた「 マリオットアメックス プレミアムカード 」の魅力とメリット、デメリットを交え詳しく紹介していきたい。
Article
マリオット ボンヴォイ アメックスで旅費を劇的に節約!高級ホテルに無料宿泊&マイルで飛行機代も無料!
シェラトンやマリオット、リッツ・カールトンに無料宿泊したり、部屋のアップグレードがあったり、無料でレイトチェックアウトできたり…。世界中を旅するモリオとミヅキの旅行をアップグレードさせた「 マリオットアメックス プレミアムカード 」の魅力とメリット、デメリットを交え詳しく紹介していきたい。
![[Taiwan Travel] Things to note when using UBER in Taiwan!](/datas/contents/img/TAIWAN-010-UBER/thum.webp) Taiwan Travel
[Taiwan Travel] Things to note when using UBER in Taiwan!
In Taiwan, taxis often only speak Chinese, and you can only pay in cash, but if you call a taxi with UBER, you can select your destination and pay through the UBER app, which is very convenient. However, you need to be careful when using UBER, as if you are not careful, you may be hit with an unexpectedly high bill.
Taiwan Travel
[Taiwan Travel] Things to note when using UBER in Taiwan!
In Taiwan, taxis often only speak Chinese, and you can only pay in cash, but if you call a taxi with UBER, you can select your destination and pay through the UBER app, which is very convenient. However, you need to be careful when using UBER, as if you are not careful, you may be hit with an unexpectedly high bill.
 Travel Tips
Compact & Easy: Travel Makeup Hacks Using 100-Yen Contact Lens Cases
Discover easy travel makeup hacks to pack light and leak-free! Learn how to use 100-yen store contact lens cases for compact skincare and cosmetics storage, perfect for any trip. Try these budget-friendly tips today!
Travel Tips
Compact & Easy: Travel Makeup Hacks Using 100-Yen Contact Lens Cases
Discover easy travel makeup hacks to pack light and leak-free! Learn how to use 100-yen store contact lens cases for compact skincare and cosmetics storage, perfect for any trip. Try these budget-friendly tips today!
 Macau Travel
10 recommended sightseeing spots guide in Macau
10 recommended sightseeing spots you definitely want to visit when traveling to Macau. Macau is famous for its casinos, but it actually developed uniquely as a Portuguese colony in the 19th century, and its cultural aspect, which is a fusion of Europe and Asia, is also very attractive. Here are 10 recommended sightseeing spots in Macau that you should definitely check out when you travel to Macau.
Macau Travel
10 recommended sightseeing spots guide in Macau
10 recommended sightseeing spots you definitely want to visit when traveling to Macau. Macau is famous for its casinos, but it actually developed uniquely as a Portuguese colony in the 19th century, and its cultural aspect, which is a fusion of Europe and Asia, is also very attractive. Here are 10 recommended sightseeing spots in Macau that you should definitely check out when you travel to Macau.
 Measuretrip
Travelogue
旅行好きな夫婦モリオとミヅキがマイルやポイント、格安航空券を駆使しつつ、格安で世界を旅する顔が見える旅行記ブログ。搭乗した飛行機やクルーズ船の中の様子、ホテルのレビュー、美味しいレストラン、お得に旅行できる裏技、旅先での便利な情報、かかった費用など様々な情報をお届け!夫婦喧嘩あり、ホロッと涙することもあり、中年夫婦の等身大旅行記ブログ。
Measuretrip
Travelogue
旅行好きな夫婦モリオとミヅキがマイルやポイント、格安航空券を駆使しつつ、格安で世界を旅する顔が見える旅行記ブログ。搭乗した飛行機やクルーズ船の中の様子、ホテルのレビュー、美味しいレストラン、お得に旅行できる裏技、旅先での便利な情報、かかった費用など様々な情報をお届け!夫婦喧嘩あり、ホロッと涙することもあり、中年夫婦の等身大旅行記ブログ。
 iPnone
【古い機種でもOK】iPhoneで綺麗な星空を撮る方法・天の川や流星群も【iPhone 星空撮影】
iPhoneを使った綺麗な星空の撮り方と、iPhone星空撮影に使用するおすすめアプリ、必要機材などを紹介。最新機種でなくても取れる方法です。このiPhoneの星空撮影方法を使えば肉眼でも見るのがやっとな天の川や星雲、そして運が良ければ流星群の流れ星も撮影可能なので、iPhoneで綺麗な星空撮影をしたいときはチャレンジしてみよう。
iPnone
【古い機種でもOK】iPhoneで綺麗な星空を撮る方法・天の川や流星群も【iPhone 星空撮影】
iPhoneを使った綺麗な星空の撮り方と、iPhone星空撮影に使用するおすすめアプリ、必要機材などを紹介。最新機種でなくても取れる方法です。このiPhoneの星空撮影方法を使えば肉眼でも見るのがやっとな天の川や星雲、そして運が良ければ流星群の流れ星も撮影可能なので、iPhoneで綺麗な星空撮影をしたいときはチャレンジしてみよう。
 Rakuten MOBILE
How to use Rakuten Mobile overseas
How to use Rakuten Mobile overseas. Rakuten Mobile offers free data communication up to 2GB even when used overseas. Additionally, if you use Rakuten Link, a dedicated Rakuten mobile app, you can make calls from overseas to Japan free of charge and avoid high charges.
Rakuten MOBILE
How to use Rakuten Mobile overseas
How to use Rakuten Mobile overseas. Rakuten Mobile offers free data communication up to 2GB even when used overseas. Additionally, if you use Rakuten Link, a dedicated Rakuten mobile app, you can make calls from overseas to Japan free of charge and avoid high charges.